Step by step NFT collection minting
👋 Introduction
Non-fungible tokens (NFTs) have become one of the hottest topics in the world of digital art and collectibles. NFTs are unique digital assets that use blockchain technology to verify ownership and authenticity. They have opened up new possibilities for creators and collectors to monetize and trade digital art, music, videos, and other forms of digital content. In recent years, the NFT market has exploded, with some high-profile sales reaching millions of dollars. In this article, we will build an NFT collection on TON step by step.
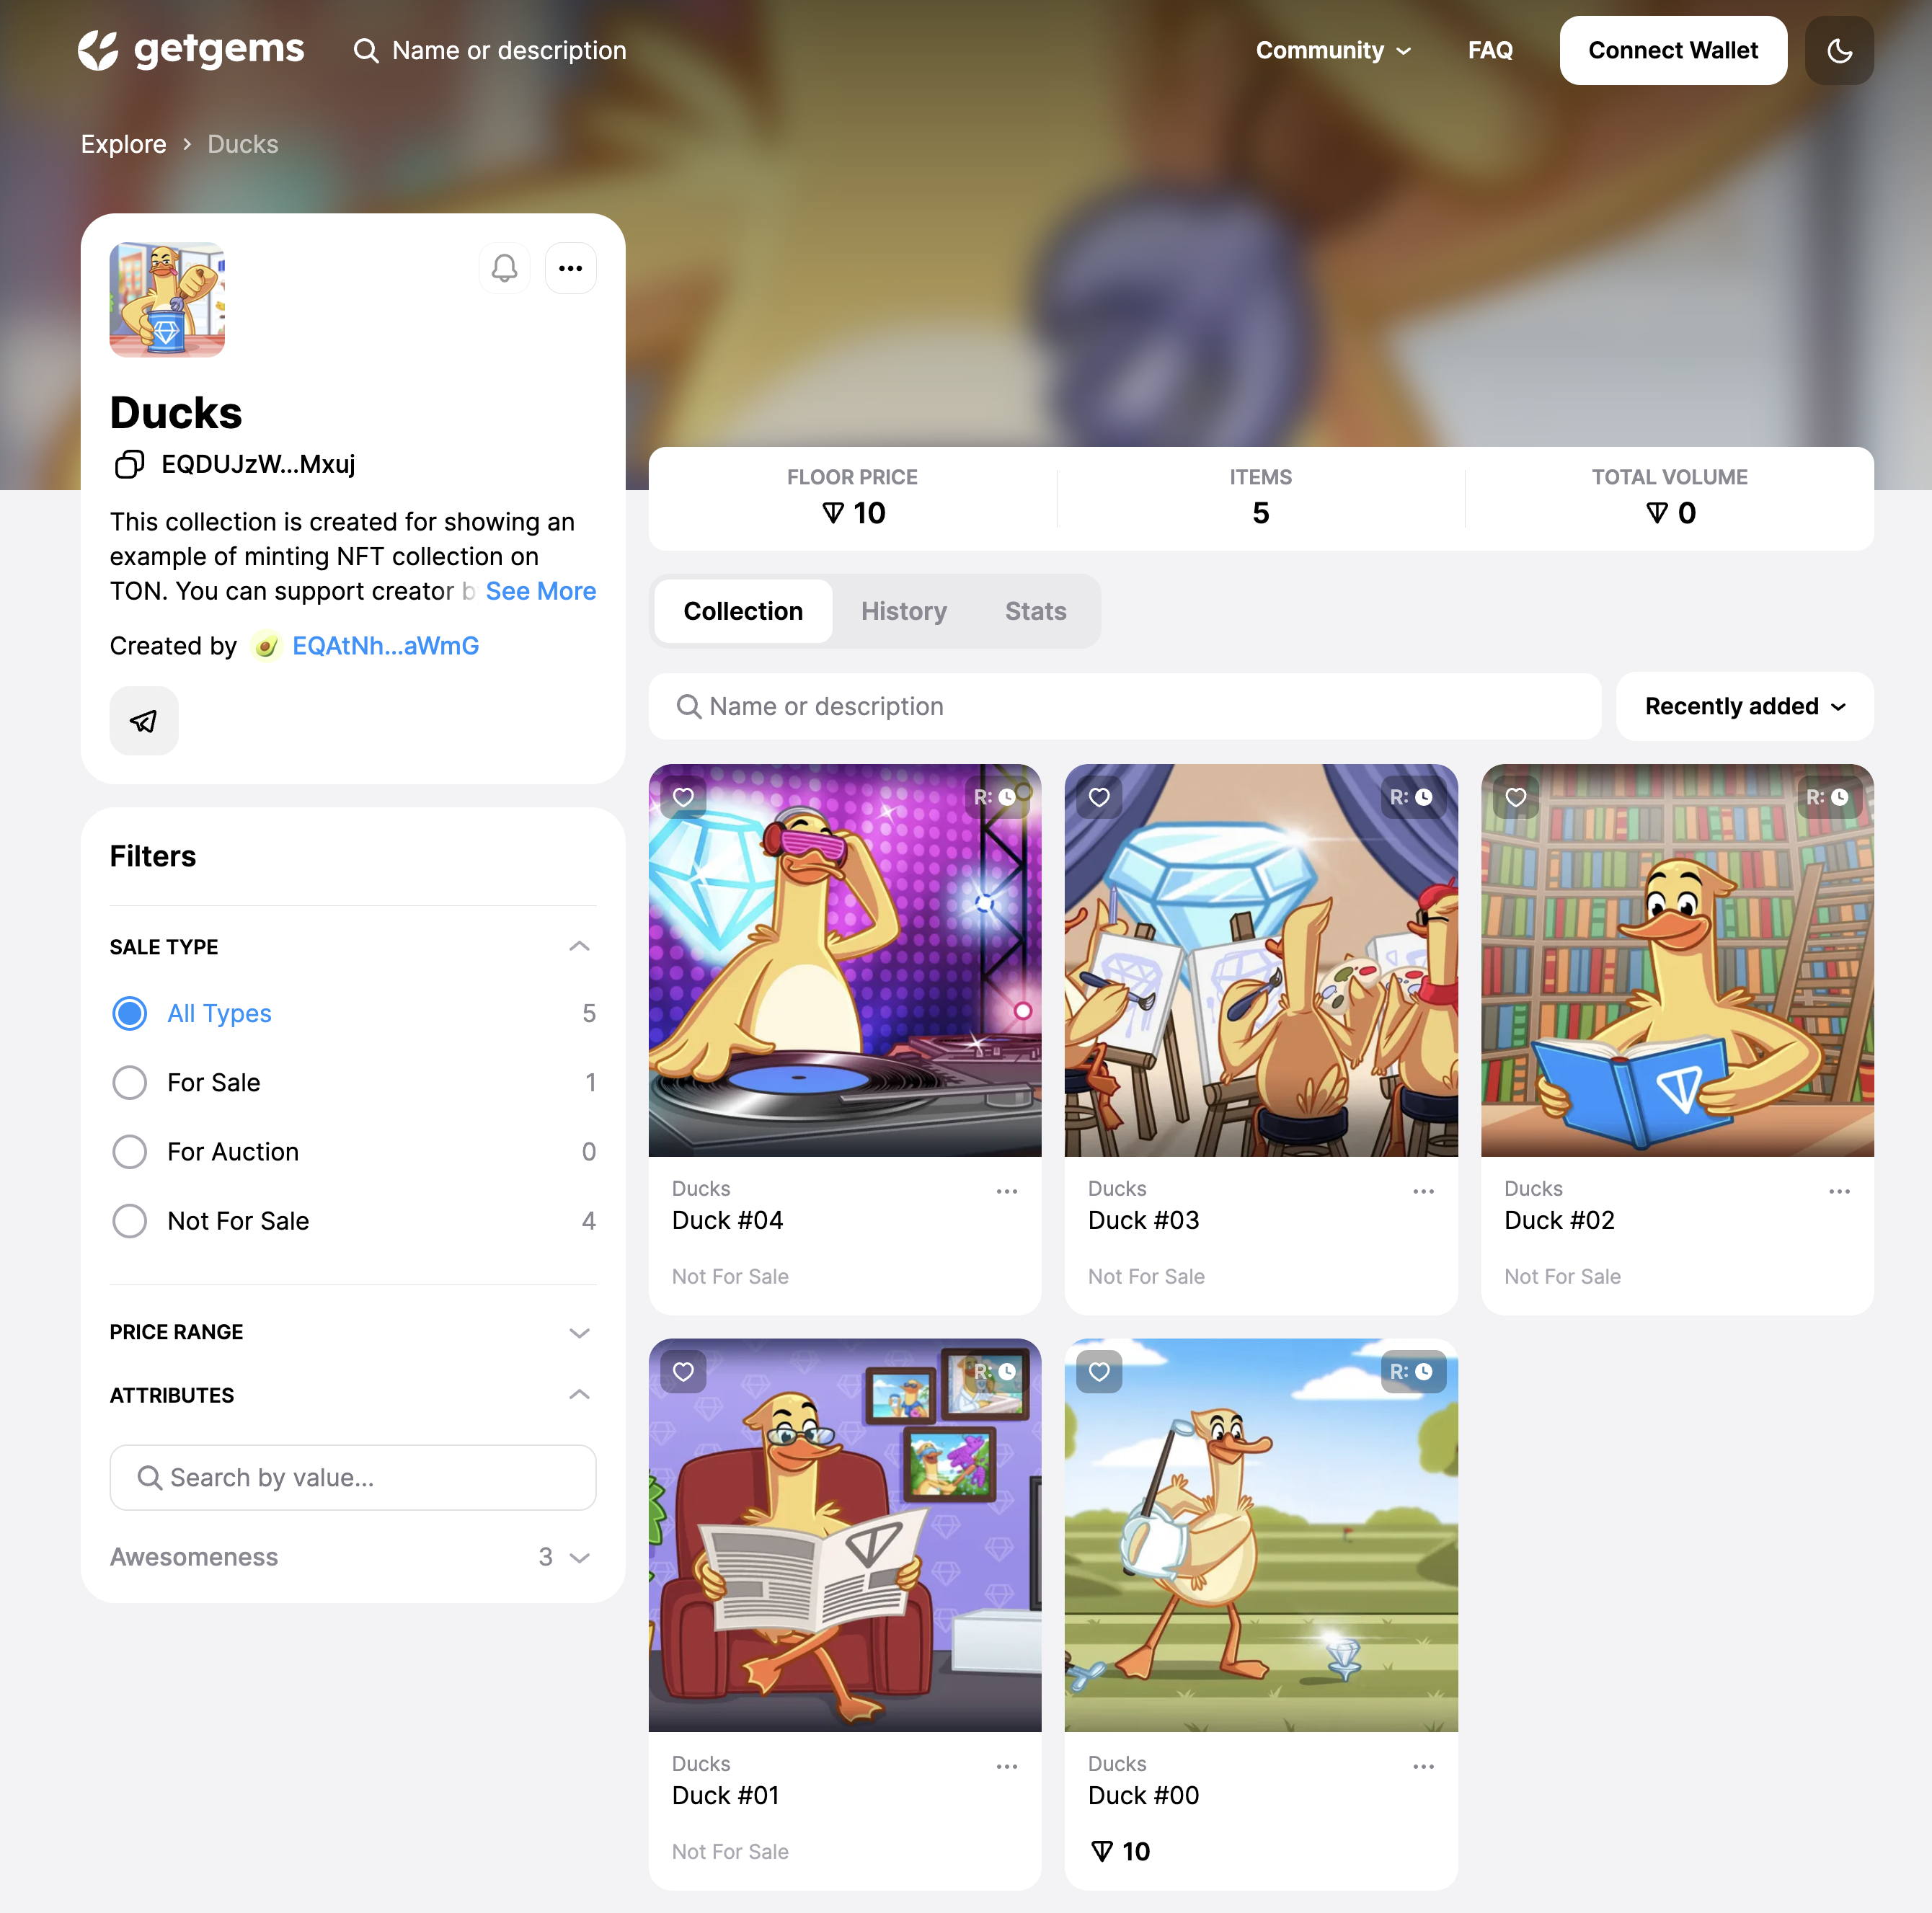
This is the beautiful collection of ducks you will create by the end of this tutorial:
🦄 What you will learn
- You will mint NFT collection on TON.
- You will understand how NFTs on TON works.
- You will put NFT on sale.
- You will upload metadata to pinata.cloud.
💡 Prerequisites
You must already have a testnet wallet with at least 2 TON in it. You can get testnet coins from @testgiver_ton_bot.
- Open settings and click 5 times on the Tonkeeper logo located at the bottom.
- Activate Dev mode.
- Get back to main menu and create new Testnet wallet with Add wallet/Add Testnet Account.
We will use Pinata as our IPFS storage system, so you also need to create an account on pinata.cloud and get api_key & api_secreat. Official Pinata documentation tutorial can help with that. Once you have these API tokens, I’ll be waiting for you here!
💎 What is it NFT on TON?
Before starting the main part of our tutorial, we need to understand how NFTs work on TON in general terms. Unexpectedly, we will start with an explanation of how NFTs work on Ethereum (ETH), to understand the uniqueness of NFT implementation on TON compared to other blockchains in the industry.
NFT implementation on ETH
The implementation of the NFT in ETH is extremely simple - there is 1 main contract of the collection, which stores a simple hashmap, which in turn stores the data of the NFT from this collection. All requests related to this collection (if any user wants to transfer the NFT, put it up for sale, etc.) are sent specifically to this single contract of the collection.
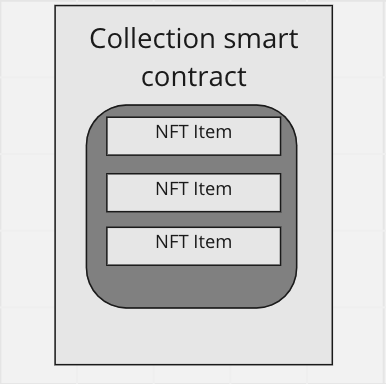
Problems that can occur with such implementation in TON
The problems of such an implementation in the context of TON are perfectly described by the NFT standard in TON:
-
Unpredictable gas consumption. In TON, gas consumption for dictionary operations depends on exact set of keys. Also, TON is an asynchronous blockchain. This means that if you send a message to a smart contract, then you do not know how many messages from other users will reach the smart contract before your message. Thus, you do not know what the size of the dictionary will be at the moment when your message reaches the smart contract. This is OK with a simple wallet -> NFT smart contract interaction, but not acceptable with smart contract chains, e.g. wallet -> NFT smart contract -> auction -> NFT smart contract. If we cannot predict gas consumption, then a situation may occur like that the owner has changed on the NFT smart contract, but there were no enough Toncoins for the auction operation. Using smart contracts without dictionaries gives deterministic gas consumption.
-
Does not scale (becomes a bottleneck). Scaling in TON is based on the concept of sharding, i.e. automatic partitioning of the network into shardchains under load. The single big smart contract of the popular NFT contradicts this concept. In this case, many transactions will refer to one single smart contract. The TON architecture provides for sharded smart contracts(see whitepaper), but at the moment they are not implemented.
TL;DR ETH solution it's not scalable and not suitable for asynchronous blockchain like TON.
TON NFT implementation
On TON, we have on master contract - smart contract of our collection, that store it's metadata and address of it's owner and the main thing - that if we want to create("mint") new NFT Item - we just need to send message to this collection contract. This collection contract will then deploy a new NFT item contract for us, using the data we provide.

You can check NFT processing on TON article or read NFT standard if you want to dive deeper into this topic
⚙ Setup development environment
Let's start by creating an empty project:
- Create new folder
mkdir MintyTON
- Open this folder
cd MintyTON
- Init our project
yarn init -y
- Install typescript
yarn add typescript @types/node -D
- Init TypeScript project
tsc --init
- Copy this config to tsconfig.json
{
    "compilerOptions": {
      "module": "commonjs",
      "target": "es6",
      "lib": ["ES2022"],
      "moduleResolution": "node",
      "sourceMap": true,
      "outDir": "dist",
      "baseUrl": "src",
      "emitDecoratorMetadata": true,
      "experimentalDecorators": true,
      "strict": true,
      "esModuleInterop": true,
      "strictPropertyInitialization": false
    },
    "include": ["src/**/*"]
}
- Add script to build & start our app to
package.json
"scripts": {
    "start": "tsc --skipLibCheck && node dist/app.js"
  },
- Install required libraries
yarn add @pinata/sdk dotenv @ton/ton @ton/crypto @ton/core buffer
- Create
.envfile and add your own data based on this template
PINATA_API_KEY=your_api_key
PINATA_API_SECRET=your_secret_api_key
MNEMONIC=word1 word2 word3 word4
TONCENTER_API_KEY=aslfjaskdfjasasfas
You can get toncenter api key from @tonapibot and choose mainnet or testnet. In MNEMONIC variable store 24 words of collection owner wallet seed phrase.
Great! Now we are ready to start writing code for our project.
Write helper functions
Firstly let's create function openWallet in src/utils.ts, that will open our wallet by mnemonic and return publicKey/secretKey of it.
We get a pair of keys based on 24 words(seed phrase):
import { KeyPair, mnemonicToPrivateKey } from "@ton/crypto";
import { beginCell, Cell, OpenedContract} from "@ton/core";
import { TonClient, WalletContractV4 } from "@ton/ton";

export type OpenedWallet = {
  contract: OpenedContract<WalletContractV4>;
  keyPair: KeyPair;
};

export async function openWallet(mnemonic: string[], testnet: boolean) {
  const keyPair = await mnemonicToPrivateKey(mnemonic);
Create a class instance to interact with toncenter:
  const toncenterBaseEndpoint: string = testnet
    ? "https://testnet.toncenter.com"
    : "https://toncenter.com";

  const client = new TonClient({
    endpoint: `${toncenterBaseEndpoint}/api/v2/jsonRPC`,
    apiKey: process.env.TONCENTER_API_KEY,
  });
And finally open our wallet:
  const wallet = WalletContractV4.create({
      workchain: 0,
      publicKey: keyPair.publicKey,
    });

  const contract = client.open(wallet);
  return { contract, keyPair };
}
Nice, after that we will create main entrypoint for our project - src/app.ts.
Here will use just created function openWallet and call our main function init.
Thats enough for now.
import * as dotenv from "dotenv";

import { openWallet } from "./utils";
import { readdir } from "fs/promises";

dotenv.config();

async function init() {
  const wallet = await openWallet(process.env.MNEMONIC!.split(" "), true);
}

void init();
And by the end, let's create delay.ts file in src directory, in which we will create function to wait until seqno increases.
import { OpenedWallet } from "./utils";

export async function waitSeqno(seqno: number, wallet: OpenedWallet) {
  for (let attempt = 0; attempt < 10; attempt++) {
    await sleep(2000);
    const seqnoAfter = await wallet.contract.getSeqno();
    if (seqnoAfter == seqno + 1) break;
  }
}

export function sleep(ms: number): Promise<void> {
  return new Promise((resolve) => setTimeout(resolve, ms));
}
In simply words, seqno it's just a counter of outgoing transactions sent by wallet. Seqno used to prevent Replay Attacks. When a transaction is sent to a wallet smart contract, it compares the seqno field of the transaction with the one inside its storage. If they match, it's accepted and the stored seqno is incremented by one. If they don't match, the transaction is discarded. That's why we will need to wait a bit, after every outgoing transaction.
🖼 Prepare metadata
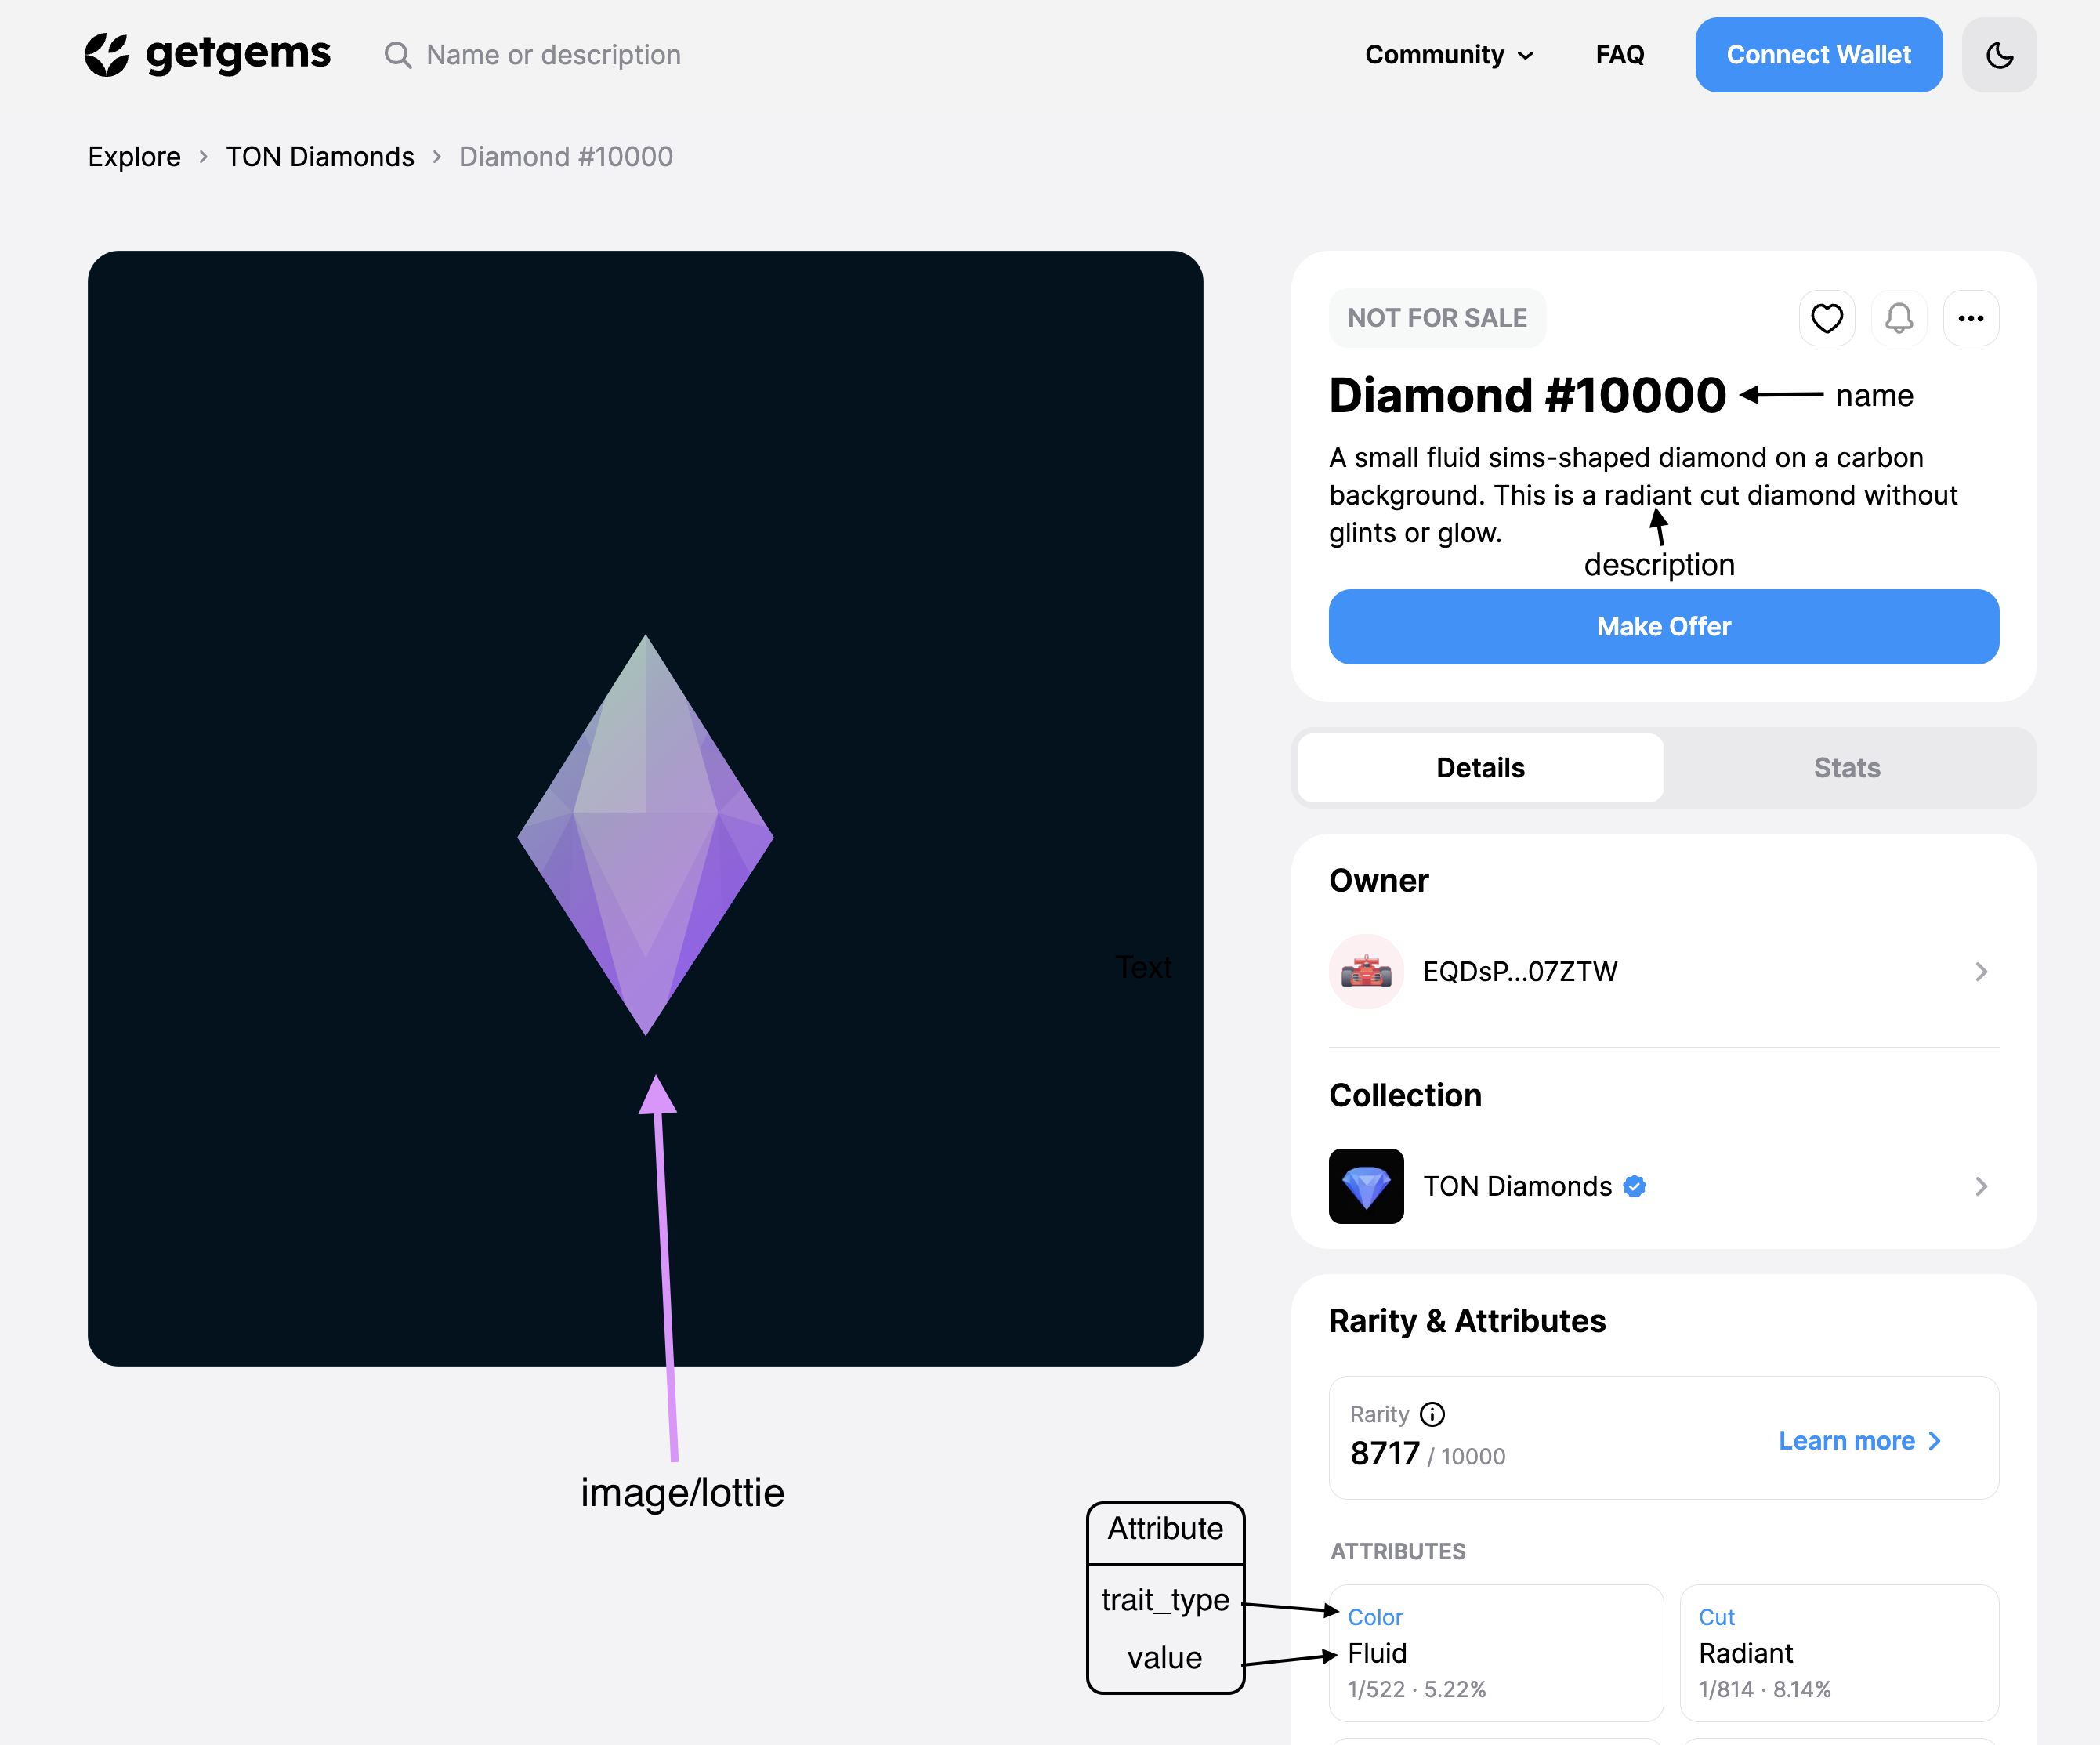
Metadata - is just a simple information that will describe our NFT or collection. For example it's name, it's description, etc.
Firstly, we need to store images of our NFT's in /data/images with name 0.png, 1.png, ... for photo of items, and logo.png for avatar of our collection. You can easily download pack with ducks images or put your images into that folder. And also we will store all our metadata files in /data/metadata/ folder.
NFT specifications
Most products on TON supports such metatadata specifications to store information about NFT collection:
| Name | Explanation |
|---|---|
| name | Collection name |
| description | Collection description |
| image | Link to the image, that will be displayed as the avatar. Supported link formats: https, ipfs, TON Storage. |
| cover_image | Link to the image, that will be displayed as the collection’s cover image. |
| social_links | List of links to the project’s social media profiles. Use no more than 10 links. |

Based on this info, let's create our own metadata file collection.json, that will describe the metadata of our collection!
{
  "name": "Ducks on TON",
  "description": "This collection is created for showing an example of minting NFT collection on TON. You can support creator by buying one of this NFT.",
  "social_links": ["https://t.me/DucksOnTON"]
}
Note that we didn't write the "image" parameter, you will know why a bit later, just wait!
After creation of collection metadata file we need to create metadata of our NFT's
Specifications of NFT Item metadata:
| Name | Explanation |
|---|---|
| name | NFT name. Recommended length: No more than 15-30 characters |
| description | NFT description. Recommended length: Up to 500 characters |
| image | Link to the image of NFT. |
| attributes | NFT attributes. A list of attributes, where a trait_type (attribute name) and value (a short description of the attribution) is specified. |
| lottie | Link to the json file with Lottie animation. If specified, the Lottie animation from this link will be played on page with the NFT. |
| content_url | Link to additional content. |
| content_type | The type of content added through the content_url link. For example, a video/mp4 file. |
{
  "name": "Duck #00",
  "description": "What about a round of golf?",
  "attributes": [{ "trait_type": "Awesomeness", "value": "Super cool" }]
}
After that, you can create as many files of NFT item with their metadata as you want.
Upload metadata
Now let's write some code, that will upload our metadata files to IPFS. Create metadata.ts file in src directory and add all needed imports:
import pinataSDK from "@pinata/sdk";
import { readdirSync } from "fs";
import { writeFile, readFile } from "fs/promises";
import path from "path";
After that, we need to create function, that will actually upload all files from our folder to IPFS:
export async function uploadFolderToIPFS(folderPath: string): Promise<string> {
  const pinata = new pinataSDK({
    pinataApiKey: process.env.PINATA_API_KEY,
    pinataSecretApiKey: process.env.PINATA_API_SECRET,
  });

  const response = await pinata.pinFromFS(folderPath);
  return response.IpfsHash;
}
Excellent! Let's return to the question at hand: why did we leave the "image" field in the metadata files empty? Imagine a situation where you want to create 1000 NFTs in your collection and, accordingly, you have to manually go through each item and manually insert a link to your picture. This is really inconvenient and wrong, so let's write a function that will do this automatically!
export async function updateMetadataFiles(metadataFolderPath: string, imagesIpfsHash: string): Promise<void> {
  const files = readdirSync(metadataFolderPath);

  await Promise.all(files.map(async (filename, index) => {
    const filePath = path.join(metadataFolderPath, filename)
    const file = await readFile(filePath);

    const metadata = JSON.parse(file.toString());
    metadata.image =
      index != files.length - 1
        ? `ipfs://${imagesIpfsHash}/${index}.jpg`
        : `ipfs://${imagesIpfsHash}/logo.jpg`;

    await writeFile(filePath, JSON.stringify(metadata));
  }));
}
Here we firstly read all of the files in specified folder:
const files = readdirSync(metadataFolderPath);
Iterate over each file and get its content
const filePath = path.join(metadataFolderPath, filename)
const file = await readFile(filePath);

const metadata = JSON.parse(file.toString());
After that, we assign the value ipfs://{IpfsHash}/{index}.jpg to the image field if it's not last file in the folder, otherwise ipfs://{imagesIpfsHash}/logo.jpg and actually rewrite our file with new data.
Full code of metadata.ts:
import pinataSDK from "@pinata/sdk";
import { readdirSync } from "fs";
import { writeFile, readFile } from "fs/promises";
import path from "path";

export async function uploadFolderToIPFS(folderPath: string): Promise<string> {
  const pinata = new pinataSDK({
    pinataApiKey: process.env.PINATA_API_KEY,
    pinataSecretApiKey: process.env.PINATA_API_SECRET,
  });

  const response = await pinata.pinFromFS(folderPath);
  return response.IpfsHash;
}

export async function updateMetadataFiles(metadataFolderPath: string, imagesIpfsHash: string): Promise<void> {
  const files = readdirSync(metadataFolderPath);

  files.forEach(async (filename, index) => {
    const filePath = path.join(metadataFolderPath, filename)
    const file = await readFile(filePath);

    const metadata = JSON.parse(file.toString());
    metadata.image =
      index != files.length - 1
        ? `ipfs://${imagesIpfsHash}/${index}.jpg`
        : `ipfs://${imagesIpfsHash}/logo.jpg`;

    await writeFile(filePath, JSON.stringify(metadata));
  });
}
Great, let's call this methods in our app.ts file. Add imports of our functions:
import { updateMetadataFiles, uploadFolderToIPFS } from "./src/metadata";
Save variables with path to the metadata/images folder and call our functions to upload metadata.
async function init() {
  const metadataFolderPath = "./data/metadata/";
  const imagesFolderPath = "./data/images/";

  const wallet = await openWallet(process.env.MNEMONIC!.split(" "), true);

  console.log("Started uploading images to IPFS...");
  const imagesIpfsHash = await uploadFolderToIPFS(imagesFolderPath);
  console.log(
    `Successfully uploaded the pictures to ipfs: https://gateway.pinata.cloud/ipfs/${imagesIpfsHash}`
  );

  console.log("Started uploading metadata files to IPFS...");
  await updateMetadataFiles(metadataFolderPath, imagesIpfsHash);
  const metadataIpfsHash = await uploadFolderToIPFS(metadataFolderPath);
  console.log(
    `Successfully uploaded the metadata to ipfs: https://gateway.pinata.cloud/ipfs/${metadataIpfsHash}`
  );
}
After that you can run yarn start and see link to your deployed metadata!
Encode offchain content
How will link to our metadata files stored in smart contract? This question can be fully answered by the Token Data Standart. In some cases, it will not be enough to simply provide the desired flag and provide the link as ASCII characters, which is why let's consider an option in which it will be necessary to split our link into several parts using the snake format.
Firstly create function in ./src/utils.ts, that will convert our buffer into chunks:
function bufferToChunks(buff: Buffer, chunkSize: number) {
  const chunks: Buffer[] = [];
  while (buff.byteLength > 0) {
    chunks.push(buff.subarray(0, chunkSize));
    buff = buff.subarray(chunkSize);
  }
  return chunks;
}
And create function, that will bind all the chunks into 1 snake-cell:
function makeSnakeCell(data: Buffer): Cell {
  const chunks = bufferToChunks(data, 127);

  if (chunks.length === 0) {
    return beginCell().endCell();
  }

  if (chunks.length === 1) {
    return beginCell().storeBuffer(chunks[0]).endCell();
  }

  let curCell = beginCell();

  for (let i = chunks.length - 1; i >= 0; i--) {
    const chunk = chunks[i];

    curCell.storeBuffer(chunk);

    if (i - 1 >= 0) {
      const nextCell = beginCell();
      nextCell.storeRef(curCell);
      curCell = nextCell;
    }
  }

  return curCell.endCell();
}
Finally, we need to create function that will encode offchain content into cell using this functions:
export function encodeOffChainContent(content: string) {
  let data = Buffer.from(content);
  const offChainPrefix = Buffer.from([0x01]);
  data = Buffer.concat([offChainPrefix, data]);
  return makeSnakeCell(data);
}
🚢 Deploy NFT Collection
When our metadata is ready and already uploaded to IPFS, we can start with deploying our collection!
We will create file, that will store all logic related to our collection in /contracts/NftCollection.ts file. As always will start with imports:
import {
  Address,
  Cell,
  internal,
  beginCell,
  contractAddress,
  StateInit,
  SendMode,
} from "@ton/core";
import { encodeOffChainContent, OpenedWallet } from "../utils";
And declare type wich will describe init data that we need for our collection:
export type collectionData = {
  ownerAddress: Address;
  royaltyPercent: number;
  royaltyAddress: Address;
  nextItemIndex: number;
  collectionContentUrl: string;
  commonContentUrl: string;
}
| Name | Explanation |
|---|---|
| ownerAddress | Address that will be set as owner of our collection. Only owner will be able to mint new NFT |
| royaltyPercent | Percent of each sale amount, that will go to the specified address |
| royaltyAddress | Address of wallet, that will receive royalty from sales of this NFT collection |
| nextItemIndex | The index that the next NFT item should have |
| collectionContentUrl | URL to the collection metadata |
| commonContentUrl | Base url for NFT items metadata |
Firstly let's write private method, that will return cell with code of our collection.
export class NftCollection {
  private collectionData: collectionData;

  constructor(collectionData: collectionData) {
    this.collectionData = collectionData;
  }

  private createCodeCell(): Cell {
    const NftCollectionCodeBoc =
      "te6cckECFAEAAh8AART/APSkE/S88sgLAQIBYgkCAgEgBAMAJbyC32omh9IGmf6mpqGC3oahgsQCASAIBQIBIAcGAC209H2omh9IGmf6mpqGAovgngCOAD4AsAAvtdr9qJofSBpn+pqahg2IOhph+mH/SAYQAEO4tdMe1E0PpA0z/U1NQwECRfBNDUMdQw0HHIywcBzxbMyYAgLNDwoCASAMCwA9Ra8ARwIfAFd4AYyMsFWM8WUAT6AhPLaxLMzMlx+wCAIBIA4NABs+QB0yMsCEsoHy//J0IAAtAHIyz/4KM8WyXAgyMsBE/QA9ADLAMmAE59EGOASK3wAOhpgYC42Eit8H0gGADpj+mf9qJofSBpn+pqahhBCDSenKgpQF1HFBuvgoDoQQhUZYBWuEAIZGWCqALnixJ9AQpltQnlj+WfgOeLZMAgfYBwGyi544L5cMiS4ADxgRLgAXGBEuAB8YEYGYHgAkExIREAA8jhXU1DAQNEEwyFAFzxYTyz/MzMzJ7VTgXwSED/LwACwyNAH6QDBBRMhQBc8WE8s/zMzMye1UAKY1cAPUMI43gED0lm+lII4pBqQggQD6vpPywY/egQGTIaBTJbvy9AL6ANQwIlRLMPAGI7qTAqQC3gSSbCHis+YwMlBEQxPIUAXPFhPLP8zMzMntVABgNQLTP1MTu/LhklMTugH6ANQwKBA0WfAGjhIBpENDyFAFzxYTyz/MzMzJ7VSSXwXiN0CayQ==";
    return Cell.fromBase64(NftCollectionCodeBoc);
  }
}
In this code, we just read Cell from base64 representation of collection smart contract.
Okey, remained only cell with init data of our collection. Basicly, we just need to store data from collectionData in correct way. Firstly we need to create an empty cell and store there collection owner address and index of next item that will be minted. Let's write next private method:
private createDataCell(): Cell {
  const data = this.collectionData;
  const dataCell = beginCell();

  dataCell.storeAddress(data.ownerAddress);
  dataCell.storeUint(data.nextItemIndex, 64);
Next after that, we creating an empty cell that will store content of our collection, and after that store ref to the cell with encoded content of our collection. And right after that store ref to contentCell in our main data cell.
const contentCell = beginCell();

const collectionContent = encodeOffChainContent(data.collectionContentUrl);

const commonContent = beginCell();
commonContent.storeBuffer(Buffer.from(data.commonContentUrl));

contentCell.storeRef(collectionContent);
contentCell.storeRef(commonContent.asCell());
dataCell.storeRef(contentCell);
After that we just create cell of code of NFT item's, that will be created in our collection, and store ref to this cell in dataCell
const NftItemCodeCell = Cell.fromBase64(
  "te6cckECDQEAAdAAART/APSkE/S88sgLAQIBYgMCAAmhH5/gBQICzgcEAgEgBgUAHQDyMs/WM8WAc8WzMntVIAA7O1E0NM/+kAg10nCAJp/AfpA1DAQJBAj4DBwWW1tgAgEgCQgAET6RDBwuvLhTYALXDIhxwCSXwPg0NMDAXGwkl8D4PpA+kAx+gAxcdch+gAx+gAw8AIEs44UMGwiNFIyxwXy4ZUB+kDUMBAj8APgBtMf0z+CEF/MPRRSMLqOhzIQN14yQBPgMDQ0NTWCEC/LJqISuuMCXwSED/LwgCwoAcnCCEIt3FzUFyMv/UATPFhAkgEBwgBDIywVQB88WUAX6AhXLahLLH8s/Im6zlFjPFwGRMuIByQH7AAH2UTXHBfLhkfpAIfAB+kDSADH6AIIK+vCAG6EhlFMVoKHeItcLAcMAIJIGoZE24iDC//LhkiGOPoIQBRONkchQCc8WUAvPFnEkSRRURqBwgBDIywVQB88WUAX6AhXLahLLH8s/Im6zlFjPFwGRMuIByQH7ABBHlBAqN1viDACCAo41JvABghDVMnbbEDdEAG1xcIAQyMsFUAfPFlAF+gIVy2oSyx/LPyJus5RYzxcBkTLiAckB+wCTMDI04lUC8ANqhGIu"
);
dataCell.storeRef(NftItemCodeCell);
Royalty params stored in smart contract by royaltyFactor, royaltyBase, royaltyAddress. Percentage of royalty can be calculated with the formula (royaltyFactor / royaltyBase) * 100%. So if we know royaltyPercent it's not a problem to get royaltyFactor.
const royaltyBase = 1000;
const royaltyFactor = Math.floor(data.royaltyPercent * royaltyBase);
After our calculations we need to store royalty data in separate cell and provide ref to this cell in dataCell.
const royaltyCell = beginCell();
royaltyCell.storeUint(royaltyFactor, 16);
royaltyCell.storeUint(royaltyBase, 16);
royaltyCell.storeAddress(data.royaltyAddress);
dataCell.storeRef(royaltyCell);

return dataCell.endCell();
}
Now let's actually write getter, that will return StateInit of our collection:
public get stateInit(): StateInit {
  const code = this.createCodeCell();
  const data = this.createDataCell();

  return { code, data };
}
And getter, that will calculate Address of our collection(address of smart contract in TON is just hash of it's StateInit)
public get address(): Address {
    return contractAddress(0, this.stateInit);
  }
It remains only to write method, that will deploy the smart contract to the blockchain!
public async deploy(wallet: OpenedWallet) {
    const seqno = await wallet.contract.getSeqno();
    await wallet.contract.sendTransfer({
      seqno,
      secretKey: wallet.keyPair.secretKey,
      messages: [
        internal({
          value: "0.05",
          to: this.address,
          init: this.stateInit,
        }),
      ],
      sendMode: SendMode.PAY_GAS_SEPARATELY + SendMode.IGNORE_ERRORS,
    });
    return seqno;
  }
Deploy of new smart contract in our case - it's just sending a message from our wallet to the collection address(which one we can calculate if we have StateInit), with its StateInit!
When owner mint a new NFT, the collection accepts the owner's message and sends a new message to the created NFT smart contract(which requires paying a fee), so let's write a method that will replenish the balance of the collection based on the number of nfts for a mint:
public async topUpBalance(
    wallet: OpenedWallet,
    nftAmount: number
  ): Promise<number> {
    const feeAmount = 0.026 // approximate value of fees for 1 transaction in our case
    const seqno = await wallet.contract.getSeqno();
    const amount = nftAmount * feeAmount;

    await wallet.contract.sendTransfer({
      seqno,
      secretKey: wallet.keyPair.secretKey,
      messages: [
        internal({
          value: amount.toString(),
          to: this.address.toString({ bounceable: false }),
          body: new Cell(),
        }),
      ],
      sendMode: SendMode.PAY_GAS_SEPARATELY + SendMode.IGNORE_ERRORS,
    });

    return seqno;
  }
Perfect, let's now add few include to our app.ts:
import { waitSeqno } from "./delay";
import { NftCollection } from "./contracts/NftCollection";
And add few lines to the end of init() function to deploy new collection:
console.log("Start deploy of nft collection...");
const collectionData = {
  ownerAddress: wallet.contract.address,
  royaltyPercent: 0.05, // 0.05 = 5%
  royaltyAddress: wallet.contract.address,
  nextItemIndex: 0,
  collectionContentUrl: `ipfs://${metadataIpfsHash}/collection.json`,
  commonContentUrl: `ipfs://${metadataIpfsHash}/`,
};
const collection = new NftCollection(collectionData);
let seqno = await collection.deploy(wallet);
console.log(`Collection deployed: ${collection.address}`);
await waitSeqno(seqno, wallet);
🚢 Deploy NFT Items
When our collection is ready, we can start minting our NFT! We will store code in src/contracts/NftItem.ts
Unexpectedly, but now we need to go back to the NftCollection.ts. And add this type near to collectionData at the top of the file.
export type mintParams = {
  queryId: number | null,
  itemOwnerAddress: Address,
  itemIndex: number,
  amount: bigint,
  commonContentUrl: string
}
| Name | Explanation |
|---|---|
| itemOwnerAddress | Address that will be set as owner of item |
| itemIndex | Index of NFT Item |
| amount | Amount of TON, that will be sent to the NFT with deploy |
| commonContentUrl | The full link to the Item URL can be shown as "commonContentUrl" of collection + this commonContentUrl |
And create method in NftCollection class, that will construct body for the deploy of our NFT Item. Firstly store bit, that will indicate to collection smart contract that we want to create new NFT. After that just store queryId & index of this NFT Item.
public createMintBody(params: mintParams): Cell {
    const body = beginCell();
    body.storeUint(1, 32);
    body.storeUint(params.queryId || 0, 64);
    body.storeUint(params.itemIndex, 64);
    body.storeCoins(params.amount);
Later on create an empty cell and store owner address of this NFT:
    const nftItemContent = beginCell();
    nftItemContent.storeAddress(params.itemOwnerAddress);
And store ref in this cell(with NFT Item content) ref to the metadata of this item:
    const uriContent = beginCell();
    uriContent.storeBuffer(Buffer.from(params.commonContentUrl));
    nftItemContent.storeRef(uriContent.endCell());
Store ref to cell with item content in our body cell:
    body.storeRef(nftItemContent.endCell());
    return body.endCell();
}
Great! Now we can comeback to NftItem.ts. All we have to do is just send message to our collection contract with body of our NFT.
import { internal, SendMode, Address, beginCell, Cell, toNano } from "@ton/core";
import { OpenedWallet } from "utils";
import { NftCollection, mintParams } from "./NftCollection";
import { TonClient } from "@ton/ton";

export class NftItem {
  private collection: NftCollection;

  constructor(collection: NftCollection) {
    this.collection = collection;
  }

  public async deploy(
    wallet: OpenedWallet,
    params: mintParams
  ): Promise<number> {
    const seqno = await wallet.contract.getSeqno();
    await wallet.contract.sendTransfer({
      seqno,
      secretKey: wallet.keyPair.secretKey,
      messages: [
        internal({
          value: "0.05",
          to: this.collection.address,
          body: this.collection.createMintBody(params),
        }),
      ],
      sendMode: SendMode.IGNORE_ERRORS + SendMode.PAY_GAS_SEPARATELY,
    });
    return seqno;
  }
}
By the end, we will write short method, that will get address of NFT by it's index.
Start with creation of client variable, that will help us to call get-method of collection.
static async getAddressByIndex(
  collectionAddress: Address,
  itemIndex: number
): Promise<Address> {
  const client = new TonClient({
    endpoint: "https://testnet.toncenter.com/api/v2/jsonRPC",
    apiKey: process.env.TONCENTER_API_KEY,
  });
Then we will call get-method of collection, that will return address of NFT in this collection with such index
  const response = await client.runMethod(
    collectionAddress,
    "get_nft_address_by_index",
    [{ type: "int", value: BigInt(itemIndex) }]
  );
... and parse this address!
    return response.stack.readAddress();
}
Now let's add some code in app.ts, to automate the minting process of each NFT:
  import { NftItem } from "./contracts/NftItem";
  import { toNano } from '@ton/core';
Firstly read all of the files in folder with our metadata:
const files = await readdir(metadataFolderPath);
files.pop();
let index = 0;
Secondly top up balance of our collection:
seqno = await collection.topUpBalance(wallet, files.length);
await waitSeqno(seqno, wallet);
console.log(`Balance top-upped`);
Eventually, go through each file with metadata, create NftItem instance and call deploy method. After that we need to wait a bit, until the seqno increases:
for (const file of files) {
    console.log(`Start deploy of ${index + 1} NFT`);
    const mintParams = {
      queryId: 0,
      itemOwnerAddress: wallet.contract.address,
      itemIndex: index,
      amount: toNano("0.05"),
      commonContentUrl: file,
    };

    const nftItem = new NftItem(collection);
    seqno = await nftItem.deploy(wallet, mintParams);
    console.log(`Successfully deployed ${index + 1} NFT`);
    await waitSeqno(seqno, wallet);
    index++;
  }
🏷 Put NFT on sale
In order to put the nft for sale, we need two smart contracts.
- Marketplace, which is responsible only for logic of creating new sales
- Sale contract, which is responsible for the logic of buying/cancelling a sale
Deploy marketplace
Create new file in /contracts/NftMarketplace.ts. As usual create basic class, which will accept address of owner of this marketplace and create cell with code(we will use basic version of NFT-Marketplace smart contract) of this smart contract & initial data.
import {
  Address,
  beginCell,
  Cell,
  contractAddress,
  internal,
  SendMode,
  StateInit,
} from "@ton/core";
import { OpenedWallet } from "../utils";

export class NftMarketplace {
  public ownerAddress: Address;

  constructor(ownerAddress: Address) {
    this.ownerAddress = ownerAddress;
  }


  public get stateInit(): StateInit {
    const code = this.createCodeCell();
    const data = this.createDataCell();

    return { code, data };
  }

  private createDataCell(): Cell {
    const dataCell = beginCell();

    dataCell.storeAddress(this.ownerAddress);

    return dataCell.endCell();
  }

  private createCodeCell(): Cell {
    const NftMarketplaceCodeBoc = "te6cckEBBAEAbQABFP8A9KQT9LzyyAsBAgEgAgMAqtIyIccAkVvg0NMDAXGwkVvg+kDtRND6QDASxwXy4ZEB0x8BwAGOK/oAMAHU1DAh+QBwyMoHy//J0Hd0gBjIywXLAljPFlAE+gITy2vMzMlx+wCRW+IABPIwjvfM5w==";
    return Cell.fromBase64(NftMarketplaceCodeBoc)
  }
}
And let's create method, that will calculate address of our smart contract based on StateInit:
public get address(): Address {
    return contractAddress(0, this.stateInit);
  }
After that we need to create method, that will deploy our marketplace actually:
public async deploy(wallet: OpenedWallet): Promise<number> {
    const seqno = await wallet.contract.getSeqno();
    await wallet.contract.sendTransfer({
      seqno,
      secretKey: wallet.keyPair.secretKey,
      messages: [
        internal({
          value: "0.5",
          to: this.address,
          init: this.stateInit,
        }),
      ],
      sendMode: SendMode.IGNORE_ERRORS + SendMode.PAY_GAS_SEPARATELY,
    });
    return seqno;
  }
As you can see, this code does not differ from the deployment of other smart contracts (nft-item smart contract, from the deployment of a new collection). The only thing is that you can see that we initially replenish our marketplace not by 0.05 TON, but by 0.5. What is the reason for this? When a new smart sales contract is deployed, the marketplace accepts the request, processes it, and sends a message to the new contract (yes, the situation is similar to the situation with the NFT collection). Which is why we need a little extra tone to pay fees.
By the end, let's add few lines of code to our app.ts file, to deploy our marketplace:
import { NftMarketplace } from "./contracts/NftMarketplace";
And then
console.log("Start deploy of new marketplace  ");
const marketplace = new NftMarketplace(wallet.contract.address);
seqno = await marketplace.deploy(wallet);
await waitSeqno(seqno, wallet);
console.log("Successfully deployed new marketplace");
Deploy sale contract
Great! Right now we can already deploy smart contract of our NFT sale. How it will works? We need to deploy new contract, and after that "transfer" our nft to sale contract(in other words, we just need to change owner of our NFT to sale contract in item data). In this tutorial we will use nft-fixprice-sale-v2 sale smart contract.
Create new file in /contracts/NftSale.ts. First of all let's declare new type, that will describe data of our sale smart contract:
import {
  Address,
  beginCell,
  Cell,
  contractAddress,
  internal,
  SendMode,
  StateInit,
  storeStateInit,
  toNano,
} from "@ton/core";
import { OpenedWallet } from "utils";

export type GetGemsSaleData = {
  isComplete: boolean;
  createdAt: number;
  marketplaceAddress: Address;
  nftAddress: Address;
  nftOwnerAddress: Address | null;
  fullPrice: bigint;
  marketplaceFeeAddress: Address;
  marketplaceFee: bigint;
  royaltyAddress: Address;
  royaltyAmount: bigint;
};
And now let's create class, and basic method, that will create init data cell for our smart contract.
export class NftSale {
  private data: GetGemsSaleData;

  constructor(data: GetGemsSaleData) {
    this.data = data;
  }
}
We will begin with creation of cell with the fees information. We need to store address that will receive fee's for marketplace, amount of TON to send to the marketplace as fee. Store address that will receive royalty from the sell and royalty amount.
private createDataCell(): Cell {
  const saleData = this.data;

  const feesCell = beginCell();

  feesCell.storeAddress(saleData.marketplaceFeeAddress);
  feesCell.storeCoins(saleData.marketplaceFee);
  feesCell.storeAddress(saleData.royaltyAddress);
  feesCell.storeCoins(saleData.royaltyAmount);
Following that we can create an empty cell and just store in it information from saleData in correct order and right after that store ref to the cell with the fees information:
  const dataCell = beginCell();

  dataCell.storeUint(saleData.isComplete ? 1 : 0, 1);
  dataCell.storeUint(saleData.createdAt, 32);
  dataCell.storeAddress(saleData.marketplaceAddress);
  dataCell.storeAddress(saleData.nftAddress);
  dataCell.storeAddress(saleData.nftOwnerAddress);
  dataCell.storeCoins(saleData.fullPrice);
  dataCell.storeRef(feesCell.endCell());

  return dataCell.endCell();
}
And as always add methods to get stateInit, init code cell and address of our smart contract.
public get address(): Address {
  return contractAddress(0, this.stateInit);
}

public get stateInit(): StateInit {
  const code = this.createCodeCell();
  const data = this.createDataCell();

  return { code, data };
}

private createCodeCell(): Cell {
  const NftFixPriceSaleV2CodeBoc =
    "te6cckECDAEAAikAART/APSkE/S88sgLAQIBIAMCAATyMAIBSAUEAFGgOFnaiaGmAaY/9IH0gfSB9AGoYaH0gfQB9IH0AGEEIIySsKAVgAKrAQICzQgGAfdmCEDuaygBSYKBSML7y4cIk0PpA+gD6QPoAMFOSoSGhUIehFqBSkHCAEMjLBVADzxYB+gLLaslx+wAlwgAl10nCArCOF1BFcIAQyMsFUAPPFgH6AstqyXH7ABAjkjQ04lpwgBDIywVQA88WAfoCy2rJcfsAcCCCEF/MPRSBwCCIYAYyMsFKs8WIfoCy2rLHxPLPyPPFlADzxbKACH6AsoAyYMG+wBxVVAGyMsAFcsfUAPPFgHPFgHPFgH6AszJ7VQC99AOhpgYC42EkvgnB9IBh2omhpgGmP/SB9IH0gfQBqGBNgAPloyhFrpOEBWccgGRwcKaDjgskvhHAoomOC+XD6AmmPwQgCicbIiV15cPrpn5j9IBggKwNkZYAK5Y+oAeeLAOeLAOeLAP0BZmT2qnAbE+OAcYED6Y/pn5gQwLCQFKwAGSXwvgIcACnzEQSRA4R2AQJRAkECPwBeA6wAPjAl8JhA/y8AoAyoIQO5rKABi+8uHJU0bHBVFSxwUVsfLhynAgghBfzD0UIYAQyMsFKM8WIfoCy2rLHxnLPyfPFifPFhjKACf6AhfKAMmAQPsAcQZQREUVBsjLABXLH1ADzxYBzxYBzxYB+gLMye1UABY3EDhHZRRDMHDwBTThaBI=";

  return Cell.fromBase64(NftFixPriceSaleV2CodeBoc);
}
It remains only to form a message that we will send to our marketplace to deploy sale contract and actually send this message
Firstly, we will create an cell, that will store StateInit of our new sale contract
public async deploy(wallet: OpenedWallet): Promise<number> {
    const stateInit = beginCell()
      .store(storeStateInit(this.stateInit))
      .endCell();
Create cell with the body for our message. Firstly we need to set op-code to 1(to indicate marketplace, that we want to deploy new sale smart contract). After that we need to store coins, that will be sent to our new sale smart contract. And last of all we need to store 2 ref to stateInit of new smart contract, and a body, that will be sent to this new smart contract.
  const payload = beginCell();
  payload.storeUint(1, 32);
  payload.storeCoins(toNano("0.05"));
  payload.storeRef(stateInit);
  payload.storeRef(new Cell());
And at the end let's send our message:
  const seqno = await wallet.contract.getSeqno();
  await wallet.contract.sendTransfer({
    seqno,
    secretKey: wallet.keyPair.secretKey,
    messages: [
      internal({
        value: "0.05",
        to: this.data.marketplaceAddress,
        body: payload.endCell(),
      }),
    ],
    sendMode: SendMode.IGNORE_ERRORS + SendMode.PAY_GAS_SEPARATELY,
  });
  return seqno;
}
Perfect, when sale smart contract is deployed all that's left is to change owner of our NFT Item to address of this sale.
Transfer item
What does it mean to transfer an item? Simply send a message from the owner's wallet to the smart contract with information about who the new owner of the item is.
Go to NftItem.ts and create new static method in NftItem class, that will create body for such message:
Just create an empty cell and fill the data.
static createTransferBody(params: {
    newOwner: Address;
    responseTo?: Address;
    forwardAmount?: bigint;
  }): Cell {
    const msgBody = beginCell();
    msgBody.storeUint(0x5fcc3d14, 32); // op-code
    msgBody.storeUint(0, 64); // query-id
    msgBody.storeAddress(params.newOwner);
In addition to the op-code, query-id and address of the new owner, we must also store the address where to send a response with confirmation of a successful transfer and the rest of the incoming message coins. The amount of TON that will come to the new owner and whether he will receive a text payload.
  msgBody.storeAddress(params.responseTo || null);
  msgBody.storeBit(false); // no custom payload
  msgBody.storeCoins(params.forwardAmount || 0);
  msgBody.storeBit(0); // no forward_payload

  return msgBody.endCell();
}
And create a transfer function to transfer the NFT.
static async transfer(
    wallet: OpenedWallet,
    nftAddress: Address,
    newOwner: Address
  ): Promise<number> {
    const seqno = await wallet.contract.getSeqno();

    await wallet.contract.sendTransfer({
      seqno,
      secretKey: wallet.keyPair.secretKey,
      messages: [
        internal({
          value: "0.05",
          to: nftAddress,
          body: this.createTransferBody({
            newOwner,
            responseTo: wallet.contract.address,
            forwardAmount: toNano("0.02"),
          }),
        }),
      ],
      sendMode: SendMode.IGNORE_ERRORS + SendMode.PAY_GAS_SEPARATELY,
    });
    return seqno;
  }
Nice, now we can we are already very close to the end. Back to the app.ts and let's get address of our nft, that we want to put on sale:
const nftToSaleAddress = await NftItem.getAddressByIndex(collection.address, 0);
Create variable, that will store information about our sale.
Add to the beggining of the app.ts:
import { GetGemsSaleData, NftSale } from "./contracts/NftSale";
And then:
const saleData: GetGemsSaleData = {
  isComplete: false,
  createdAt: Math.ceil(Date.now() / 1000),
  marketplaceAddress: marketplace.address,
  nftAddress: nftToSaleAddress,
  nftOwnerAddress: null,
  fullPrice: toNano("10"),
  marketplaceFeeAddress: wallet.contract.address,
  marketplaceFee: toNano("1"),
  royaltyAddress: wallet.contract.address,
  royaltyAmount: toNano("0.5"),
};
Note, that we set nftOwnerAddress to null, because if we will do so, our sale contract would just accept our coins on deploy.
Deploy our sale:
const nftSaleContract = new NftSale(saleData);
seqno = await nftSaleContract.deploy(wallet);
await waitSeqno(seqno, wallet);
... and transfer it!
await NftItem.transfer(wallet, nftToSaleAddress, nftSaleContract.address);
Now we can launch our project and enjoy the process!
yarn start
Go to https://testnet.getgems.io/collection/{YOUR_COLLECTION_ADDRESS_HERE} and look to this perfect ducks!
Conclusion
Today you have learned a lot of new things about TON and even created your own beautiful NFT collection in the testnet! If you still have any questions or have noticed an error - feel free to write to the author - @coalus